
This blog will pave the way for the next-generation a new door to gamma workflow.
A considerable lot of you will have heard the expressions “straight work process” and “gamma remedy”.
It is an unquestionable requirement for 3D rendering, particularly inside representation since it settles such a significant number of issues with render tests, light falloff and slices post handling errands down the middle.
Well, we are not going to go into profundity about direct work process and gamma adjustment as it can turn into an intricate subject yet essentially, this work process will build the tumble off of your lights with the goal that light ventures promote all through your scene.
This blog will pave the way for the next-generation a new door to gamma workflow.
Much has not been discussed earlier about this topic.
So we have given focus on this topic so that the readers can get a brief concept of linear and gamma workflow.

Up to this point, you are accustomed to including additional lights and hitting a high multiplier esteem with a specific end goal to motivate light to surge through your scene and dispense with dull regions.
Be that as it may, this can prompt off base wore out regions.
Gamma workflow adjustment settles this issue and enables you to diminish the measure of lights in your scene, which thusly decreases rendering times.
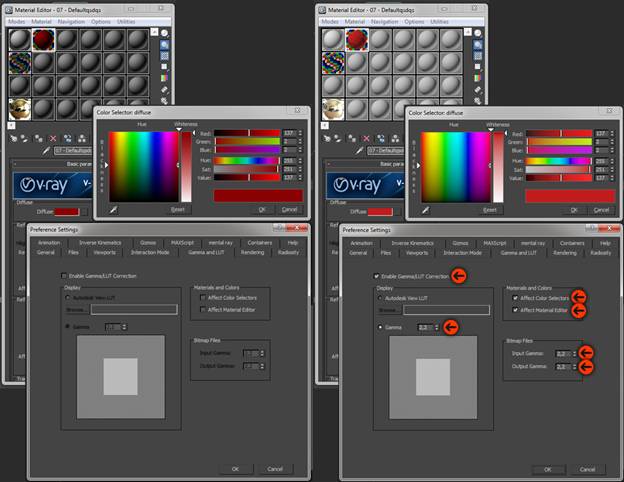
Here are the settings you would need to change keeping in mind the end goal to set it up accurately, alongside a little clarification of each progression.
Set Gamma to 2.2

Of course, both Autodesk 3ds Max and Vray work in gamma 1.0 (direct space).
In Autodesk 3ds Max inclinations under empowering gamma/out adjustment, change the gamma to 2.2.
Autodesk 3ds Max will now have an information gamma workflow of 1.0 and a yield gamma of 2.2 for standard review.
Tick both influence shading selectors and influence material editorial manager
This will radically change the way you see your material supervisor and materials inside the scene, this is the manner by which it ought to be at gamma workflow 2.2.
It will require a long time to get used to yet it is a vital advance for a straight work process.
Leave info and yield gamma workflow at 1.0 Changing this to whatever else yet 1.0 will simply befuddle matters.
Keeping this at 1.0 implies that your surfaces will dependably come in at 1.0 and go out at 1.0.
The genuine Gamma workflow change to 2.2 will happen somewhere else.
A basic clarification straight from the Autodesk 3ds Max help record clarifies why.
“In the event that you utilize bitmaps from numerous applications, and these distinctive applications have diverse perfect Input Gamma esteems, at that point turn on gamma amendment, yet leave Input Gamma workflow set to 1.0.

Rather, for every bitmap you read, utilize the individual Select Bitmap Image File exchange to set the gamma esteem proper to the program that made the bitmap.”
In Vray shading mapping, set it to straight duplicate and set gamma to 2.2.
It is prescribed to work in unadulterated straight space and finish your gamma redressing in after generation.
The tick doesn’t influence hues (adjustment as it were).
This will render out a darker form of your picture.
To see the real outcome in gamma workflow 2.2 space, tap the sRGB catch in the Vray outline cushion amid or in the wake of rendering.
Once the render is finished open it in your post preparing application and alter the gamma to 2.2.
The upside of doing it along these lines is that it permits the Vray picture sampler to see a more extensive scope of commotion, bringing about a much cleaner render.
On the other hand, you can heat the gamma workflow 2.2 into the picture by not ticking don’t influence hues (adjustment as it were).
In any case, this could prompt issues while compositing renders passes on the grounds that the last arrangement may not coordinate the RGB magnificence go because of it not being direct.
Try not to tick straight work process, it might appear like a mysterious direct work process catch however it isn’t.
Rather it is a speedy and merciless method for rectifying Vray materials to coordinate a straight work process and the outcome can be not as much as wanted.
Determine gamma 2.2 for surfaces

While adding a surface guide to the material proofreader, in the bitmap loader, physically change the gamma to 2.2.
In spite of the fact that they work in gamma workflow 1.0 (straight space), advanced cameras apply an aggregate bend which changes the gamma workflow to 2.2 to influence the picture to seem all the more satisfying to the eye.
Unless you have propelled photography aptitudes and you are working with RAW pictures, this is a useful procedure for the normal glad snapper.
It implies that, as you may have speculated, the surface guide JPEG you took with your advanced camera is now at gamma workflow 2.2.
You have to indicate the surface guide to be 2.2 gammas on section generally the picture will be at gamma 4.4 and over brilliant in light of the fact that you have just disclosed to Autodesk 3ds Max to be at gamma 2.2 for both shading selectors and the material editorial manager in stage 2.

If it’s not too much trouble note HDRI maps, knock maps, dislodging maps and typical maps don’t should be changed to gamma 2.2.
When working with straight pictures and gamma workflow 2.2, the yield is scientifically right rather than simply looking right. In post preparing, any changes will give unsurprising outcomes and are significantly less demanding to oversee.
Direct pictures result in a substantially bigger tonal range.
To adjust, it is best to spare out as a TIF record which is no less than 16-bit shading.
Sparing out an 8bit record arrangement may bring about some shading banding in light of the fact that there isn’t sufficient tonal range.
Never render out JPEGs in light of the fact that this record arrange isn’t intended for direct pictures and you will lose a considerable measure of information when sparing in this configuration at first.

Conceding that you have read the above elements perhaps you’re thinking your way to Animation–VFX–Gaming–Multimedia get into quality learning with better understanding, placement assistance, job guarantee and many more.