
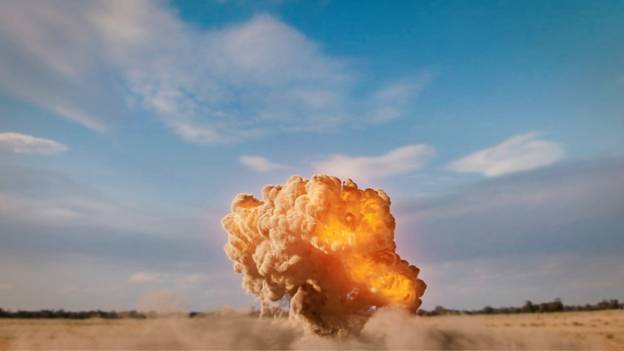
In this article, we’re going to do a small research on explosion simulations in Autodesk Maya
Explosions are a major part of our entertainment industry, starting from computer games to action films.
Notwithstanding, a large portion of the explosions you see on screens aren’t genuine.
There is a lot of things that go into the simulation of explosions.
What you require is to consider the units you will be utilizing as well as consider the fuel that is as far as anyone knows touching it off.
In addition to it, you have to contemplate how high the effect will go, the colors and hues that will show up and the directions it will travel it’ll travel in.
Every one of these things and numerous more join to give you the ideal explosion that looks dazzling on the screen.
Startup FumeFX In Maya
FumeFX is anything but difficult to use with strong inherent and built-in tools.

It has indeed an incredible association with V-Ray and also with different renderers, making it the go-to alternative for the business in both creation and computer game design.
The most recent adaptation asserts that it works up to twice as quick as rendition 3.0, so it’s additionally an extraordinary answer for enhancing your work process.
Improve & Optimize the Scene In Maya
By means of having a car moving towards the origin point in order to capture the velocity, it can interface and also interact with the particles at a very high speed with a view to effect the explosion look real and pragmatic.
In the event that you need to accomplish something comparative, you ought to streamline your geometry.
Make a low-res variant of your geometry to use in the simulations, at that point later it can be supplanted with a high-poly form with regards to rendering.
Choose your scales In Maya
Prior to you get into any of the simulations, you should have a strong working set-up.
You are ought to settle on a point unit you’ll be utilizing.
Centimeters are great yet meters are far and away superior for genuine scale.
You can utilize a scale reference, for example, an individual, to ensure the greater part of your simulations and articles are corresponding.
In the event that the scale is off then it won’t look reasonable.
Create Particles In Maya
FumeFX is a special kind of application that needs a comment or something to burn, as for example, some kind of initial geometry that the fire of the explosion will originate.
In this way, produce nParticles by changing Maya’s interface to the FX module, setting off to the nParticles menu and choosing to Create Emitter.
This gives you an Omni producer to create a point or circle, contingent upon the variant of Maya.
These particles will be touched off later on.
Ground Plane and Self Collision In Maya
During the present era, you have to make and create an explosion from particles.
The main primary thing is to include a ground plane.
Go to the Nucleus node and after that Ground Plane.
There, check the Use Plane alternative and it’ll include a vast plane for the particles to communicate with.
Change to Volume EmitterIn Maya
You ought to have a side of the equator that is discharging particles at 180 degrees.
Take the Emitter and pivot it to ensure that the level side of it is parallel to the ground, where you would then be able to put it.
This will give you the essential ‘shape’ of the explosion as it cooperates with the scene.
Set the Particle Rate In Maya

In this zone of FumeFX, you ought to have a puddle of particles on the ground.
It is being created from the Volume Emitter.
How about we roll out a few improvements to the particles.
You have to go to the Emitter and also change the Rate to something high as 6K to 10K.
Try not to stress over the asset use on your PC, you’ll just be discharging the particles for a casing or two.
Go to the nParticleShape.
Set the Particle Size to something agreeable that you can see effortlessly.
As a result, this will help you to check how your explosion is carrying on inside the scene.
Molecule-Particle Production In Maya
In the Emitter node, enter in the Rate.
Prior to the casing, you need the explosion to happen, set the Rate to 0 to guarantee that no particles are conceived before that edge.
In the casing of the explosion, set to your coveted Rate, for instance, 6,000.
At that point set the accompanying maybe a couple casings to that same high rate.
Consummation molecule generation
After you’ve begun the explosion, you ought to have three keys.
In the edge, you need the explosion to end, set another key for 6,000 and set it to 0 in the following edge to ensure the molecule and particle creation stops unexpectedly.
You can likewise make the Emitter littler or greater to control the measure of the explosion.
This won’t influence the speed of the particles, simply the time period in which they start, keep detonating, and suddenly stop.
Change the particles’ life expectancy
Go to the nParticleShape and under Lifespan, change the Lifespan mode to the Random range.
Set the Lifespan incentive to something like 0.2 or 0.3 and the Lifespan Random to a comparable esteem.
You can utilize your own qualities as indicated by your settings – you need the particles to be produced, at that point stop, and begin kicking the bucket, yet don’t hesitate to change the planning.
Change molecule speed In Maya
You can’t make the particles back off (move outwards slower) under the Basic Emitter Speed Attributes since the Speed characteristic is turned gray out, on account of the Emitter compose being set to Volume.
In this way, to change the speed, go to the Volume Speed Attributes tab and change Away from Center as required.
A few particles should move at various velocities for included authenticity.
Make the FumeFX node In Maya
You ought to have an arch of particles being produced, spreading out and kicking the bucket, some moving at various rates to others.
Next, you can begin simulation in FumeFX.
Basically, go to the FumeFX retire and tap the symbol on the far left that is called Create FumeFX node.
A 3D shape ought to show up in the scene. This is the working zone of the reenactment – the territory where the simulations will be figured.
Improve the FumeFX node In Maya
Tap the recently shaped solid shape.
You ought to be in the fumeFXShape node.
In order to start with, set the Width, Length, and Height to settle the explosion territory better.
At that point, you can center around the Spacing.
The lower the dividing, the better and more asset substantial the reenactment will be.
Promote Streamlining In Maya
The Boundless setting has an X, Y, and Z set.
Change it to +Y to ensure the simulation goes as high as could reasonably be expected.
In a similar zone, you’ll discover the way where the simulation information will be spared, frequently in gigabytes.
In the Viewport tab, you can likewise set regardless of whether to see the reenactment in the viewport.
Molecule source in FumeFX In Maya
Here, at present, you can create and make the principal simulation.
You have to ensure whether you have to ensure that you have the FumeFX rack selected of your choice and afterward, from the Outliner, select the nParticles object.
With that chose, click up in the rack to the fourth catch from the left.

You will have another object in the Outliner that closures with ‘_source’. FumeFX presently realizes that these particles are to be lighted amid the simulation.
Want to know more about the explosion?
Click here to know more.